This method is an evolution of a prior method I posted here on FF awhile back. None of this is anything new, it all exists here on FF, but has been tweaked and re-purposed to my preferred style and liking. I look forward to sharing more as time goes on, meanwhile, here's an outline of the approach I take on the 4H and 1H time frames. I will post Weekly and Daily set-ups at a later date, as I don't want to overwhelm, but it is basically the same as the 4H, with some minor differences.
Currency Pairs: EU (Weekly, Daily, 4H and 1H), all other pairs (Weekly, Daily, 4H only)
Indicators: 30 & 60 EMA's
__________________________
A. Entry Set-ups for the 4H and 1H* TFs (using long set-ups as an example):
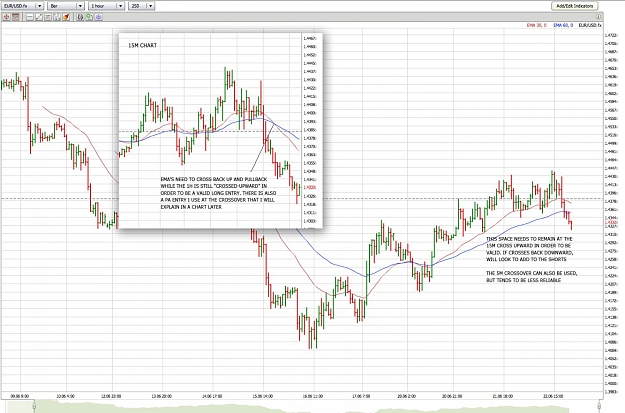
1. Wait for crossover of 30 & 60 EMA's.
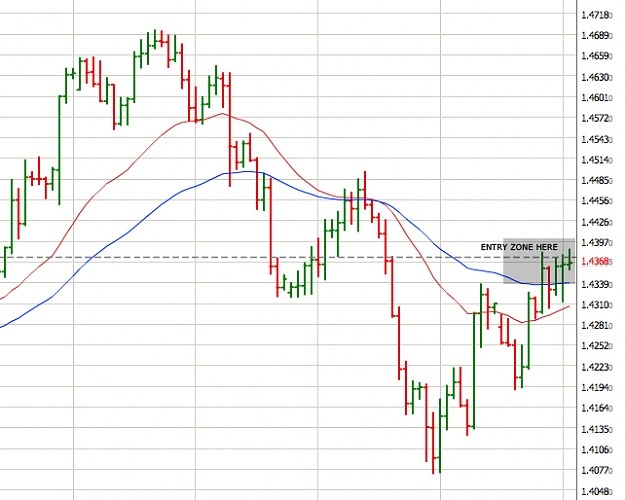
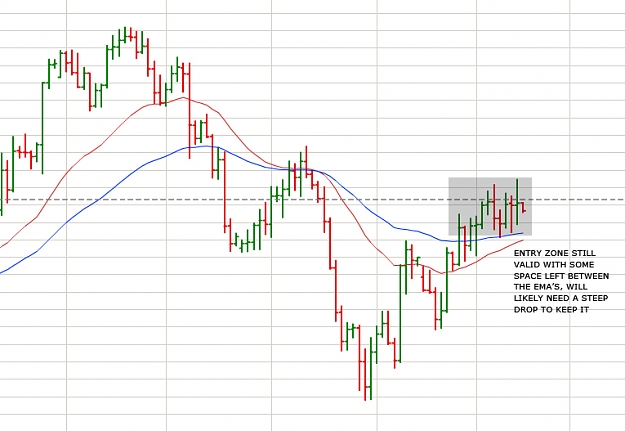
2. Wait for price to pullback and close below the 60 EMA. *For 1H TF, It is important that this is the first time price has pulled back to this zone, second and third instances do not apply. 4H can have multiple entry zones on same trend.
3. We will be in the "Entry Zone" once price has closed below the 60 EMA. Note that the 30 EMA must still be above the 60 EMA for this to be valid. The entry zones are basically areas where I will be looking to enter once the set-up has occured. It's really up to the traders discretion, as I find the actually entry not to be as important as patiently waiting for the proper set-up on the higher TF's. I will often enter based on the lower TFs if I am available to do so. I will also enter simply at the close of the 1H or 4H bar that is in my "entry zone".
4. Once in the entry zone, I prefer to add 5 positions on the 4H set-up and 2-3 positions for 1H, the reasoning will be explained later in more detail, but I like to keep 1-2 positions open for longer term holds, while closing out the remainder for shorter term profits. The entries are normally spread out a bit, I will likely enter a couple on the first close, and the rest off of lower TFs or at a second or third close below. If I have existing shorts from a prior entry set-up that are in-profit, I will often act more "freely" on my entries, not concerning myself with pinpointing on lower TFs.
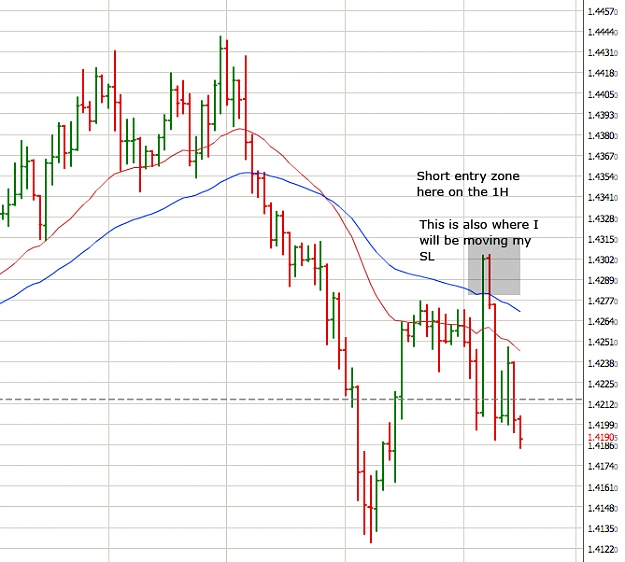
5. Stop losses will vary per entry method. My attempts on the lower TFs will have tighter stops and will likely require multiple attempts. Stops on the longer TFs will be a bit looser, normally between 50-100 pips, usually just below Daily low/high.
* A note regarding 1H entries: Entries in agreement with the 4H trend will be treated exactly as stated above. Entries that are attempting to reverse the 4H, must wait for the first break of a lower low on the 4H bar, while maintaining crossover status on the 1H. Once these cross back upward the set-up is void.
B. Managing Shorter-Term Positions for Entries on the 4H and 1H TFs
I do not have specified target profit for any of my positions. What I do is move my SL with each swing upward until I get stopped out, but I only do this for about half to 3/4 of my positions, leaving preferably a few to hold longer term.
1. I use only the 1H TF to manage the locations of the SL for the shorter term positions.
2. After all positions have been opened, and price has moved up, wait for a retrace back to the 60 EMA. Once price has closed below, wait for price to resume upwards. If it does move upwards, past the 30 EMA, move SL just below the swing low. Remember to leave at least 1 position with SL at original entry point for longer term hold.
3. Repeat the step above until SL is triggered. Once triggered, I will likely be looking to add positions in the opposing direction once a proper set-up has occured.
C. Managing Longer-Term Positions for Entries on the 4H and 1H TFs
These positions are managed with a bit more discretion and often use the assistance of the Daily and Weekly TF's to manage. The idea is to hold until a strong reversal set-up is present on the 4H, but I would still like to hold if the Daily and Weekly still show upward strength. I will expand on this a bit more once I flush out the Daily and Weekly set-ups.
__________________________
In conclusion, I would like to note that much of my enlightenment occurred during the continuos study and review of the the "Millepede Thread". I'm sure that I would be very close ending my journey if it wasn't for the priceless information shared by Graeme.
I look forward this journey of continuous learning and enlightment!
Best,
JCPFX
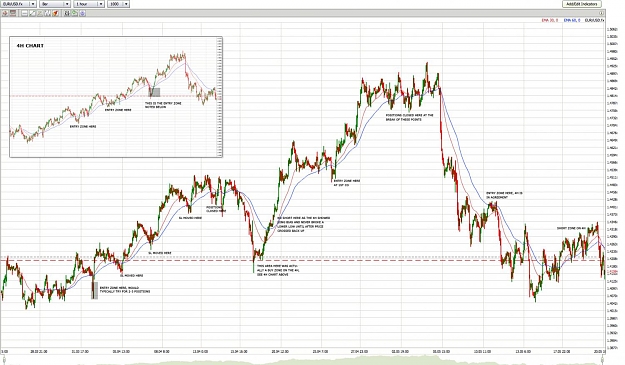
Below is a sample chart that references a few ideal set-ups. Keep in mind, it is an "ideal" set-up, there will be plenty of failed set-ups to post as this moves forward, but the beauty of using multiple TF's is the balance it brings during these times.
Currency Pairs: EU (Weekly, Daily, 4H and 1H), all other pairs (Weekly, Daily, 4H only)
Indicators: 30 & 60 EMA's
__________________________
A. Entry Set-ups for the 4H and 1H* TFs (using long set-ups as an example):
1. Wait for crossover of 30 & 60 EMA's.
2. Wait for price to pullback and close below the 60 EMA. *For 1H TF, It is important that this is the first time price has pulled back to this zone, second and third instances do not apply. 4H can have multiple entry zones on same trend.
3. We will be in the "Entry Zone" once price has closed below the 60 EMA. Note that the 30 EMA must still be above the 60 EMA for this to be valid. The entry zones are basically areas where I will be looking to enter once the set-up has occured. It's really up to the traders discretion, as I find the actually entry not to be as important as patiently waiting for the proper set-up on the higher TF's. I will often enter based on the lower TFs if I am available to do so. I will also enter simply at the close of the 1H or 4H bar that is in my "entry zone".
4. Once in the entry zone, I prefer to add 5 positions on the 4H set-up and 2-3 positions for 1H, the reasoning will be explained later in more detail, but I like to keep 1-2 positions open for longer term holds, while closing out the remainder for shorter term profits. The entries are normally spread out a bit, I will likely enter a couple on the first close, and the rest off of lower TFs or at a second or third close below. If I have existing shorts from a prior entry set-up that are in-profit, I will often act more "freely" on my entries, not concerning myself with pinpointing on lower TFs.
5. Stop losses will vary per entry method. My attempts on the lower TFs will have tighter stops and will likely require multiple attempts. Stops on the longer TFs will be a bit looser, normally between 50-100 pips, usually just below Daily low/high.
* A note regarding 1H entries: Entries in agreement with the 4H trend will be treated exactly as stated above. Entries that are attempting to reverse the 4H, must wait for the first break of a lower low on the 4H bar, while maintaining crossover status on the 1H. Once these cross back upward the set-up is void.
B. Managing Shorter-Term Positions for Entries on the 4H and 1H TFs
I do not have specified target profit for any of my positions. What I do is move my SL with each swing upward until I get stopped out, but I only do this for about half to 3/4 of my positions, leaving preferably a few to hold longer term.
1. I use only the 1H TF to manage the locations of the SL for the shorter term positions.
2. After all positions have been opened, and price has moved up, wait for a retrace back to the 60 EMA. Once price has closed below, wait for price to resume upwards. If it does move upwards, past the 30 EMA, move SL just below the swing low. Remember to leave at least 1 position with SL at original entry point for longer term hold.
3. Repeat the step above until SL is triggered. Once triggered, I will likely be looking to add positions in the opposing direction once a proper set-up has occured.
C. Managing Longer-Term Positions for Entries on the 4H and 1H TFs
These positions are managed with a bit more discretion and often use the assistance of the Daily and Weekly TF's to manage. The idea is to hold until a strong reversal set-up is present on the 4H, but I would still like to hold if the Daily and Weekly still show upward strength. I will expand on this a bit more once I flush out the Daily and Weekly set-ups.
__________________________
In conclusion, I would like to note that much of my enlightenment occurred during the continuos study and review of the the "Millepede Thread". I'm sure that I would be very close ending my journey if it wasn't for the priceless information shared by Graeme.
I look forward this journey of continuous learning and enlightment!
Best,
JCPFX
Below is a sample chart that references a few ideal set-ups. Keep in mind, it is an "ideal" set-up, there will be plenty of failed set-ups to post as this moves forward, but the beauty of using multiple TF's is the balance it brings during these times.
Attached Image (click to enlarge)