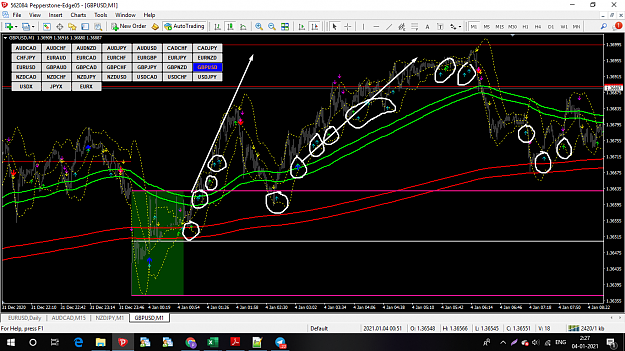
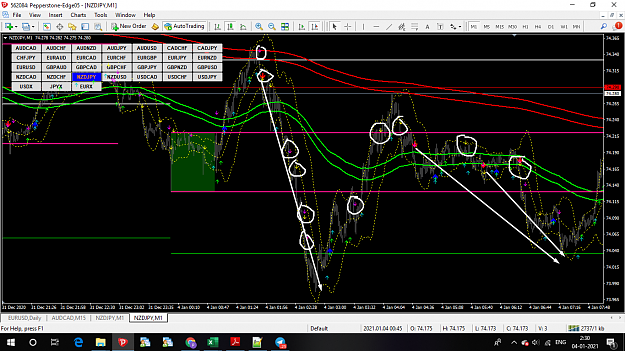
This system is simplified version of my own system.
important: refresh the chart once big arrow appeared on last candle
can be used it on major currencies.. aud, usd,nzd,gbp,eur,chf,jpy and cad.. see the screenshot.. that 28 pairs only
cant be applied to anyother currency pairs,gold,oil and index
BUY Rules:
Always 200EMA Bands above 1000EMA Bands
Buy when Big Blue arrow appears. RR 1:1
Stoploss below recent low(recent low between blue and red arrow)
extra: Lime and Dark Turquoise coloured arrows are for buy signals. RR(1:1 - 1:20)
use multiple trades and different sl when trading these arrow. sl below recent low, sl below 200ema bands, sl below 1000ema bands
SELL Rules:
Always 200EMA Bands below 1000EMA Bands
Sell when Big Red arrow appears. RR 1:1
Stoploss above recent high(recent high between red and blue arrows)
extra: Magenta and Yellow coloured arrows are for sell signals. RR(1:1 - 1:20)
use multiple trades and different sl when trading these arrow. sl above recent high, sl above 200ema bands, sl above 1000ema bands
dont enter when price moved to high or low.. if price is between 200ema bands and 1000ema bands then its good to enter multiple trade based on small arrow.. in screenshot i just used it as reference for buy and sell signal.
i leave it to you decide it on your own..
Attached Image(s) (click to enlarge)