I am no longer selling the Dashboard. I may release it again in the future.
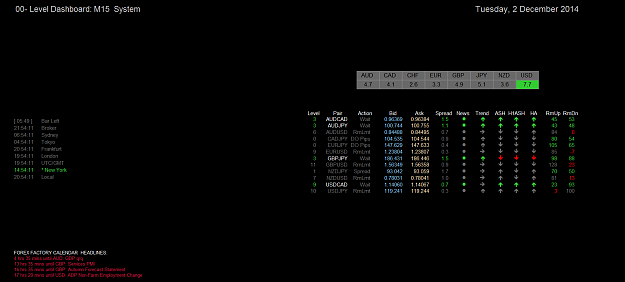
I have created this Dashboard mainly for trading the 00 Level strategy as defined in this topic As simple as possible: 00 level trading, however it can also be used by other trading Momentum and Currency Strength systems.
See the bottom of this post for some other scripts and EAs that can be used with this.
Attached Image (click to enlarge)

Attached Image (click to enlarge)
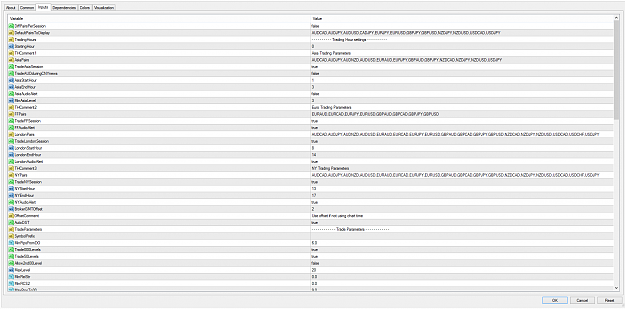
Here is a list of all the Options you can customize:
SETTINGS
DefaultPairsToDisplay:There were options for different pairs for different sessions but now there is just one list.
SortPairsAlphabetically:
True or False.
SymbolPrefix:
If there are letters in front of the currency pair, such as “mEURUSD”. Not tested. Letters after the currency pair are automatically added, up to 4.
TradingHours = "- - - - - - - - - - Trading Hour settings - - - - - - - - - -";
StartingHour:
IMPORTANT! Use 24h format; if your broker is usually GMT+3 meaning the first hour of the week is 0, set to 0. If your broker is GMT+0, set it to 21. This will determine where the week starts so you can view the data calculated from the beginning of the week, regardless of the broker’s start hour.
TradeAsiaSession:
True or False. This system was designed to trade from London Open to London Close but other options are available if you want to try other sessions.
TradeAUDduringCNYnews:
Usually only affects Asia session but CNY news can make AUD jump a lot.
AsiaStartHour:
Except for Asia, you should be able to leave all the Start Hours to the default setting if you set the GMTOffset correctly and use AutoDST. Since Asia does not use DST you may have to change the Start and End Hours at those times of the year when DST changes.
AsiaEndHour:
The End Hours determine where the Dashboard stops watching for setups. If you set this to 2, the last alert would be at 1:59, if GMTOffset is 0.
AsiaAudioAlert:
True or False.
MinAsiaLevel:
This parameter allows you to decide at what level you want alerts for Asia. Since this is typically very near the start of the day and usually not much volatility, you can get a lot of alerts that are not good setups. I have been testing 3, but Asia is tricky.
TradeFFSession:
True or False. This will automatically calculate as 1 hour before London.
FFAudioAlert:
True or False. If you trade the H1 method (Trade50Levels = false), you will NOT get alerts if the entry is below .400 or above .600. The M15 method will alert at all levels.
TradeLondonSession:
True or False.
LondonStartHour:
You should be able to leave all the Start Hours to the default setting if you set the GMTOffset correctly and use AutoDST, unless your broker does not change DST, like FinFX.
LondonEndHour:
same as Asia.
LondonAudioAlert:
True or False.
TradeNYSession:
True or False.
NYStartHour:
You should be able to leave all the Start Hours to the default setting if you set the GMTOffset correctly and use AutoDST, unless your broker does not change DST, like FinFX.
NYEndHour:
same as Asia.
NYAudioAlert:
True or False.
BrokerGMTOffset:
Set this to your broker’s offset so you don’t need to change the Start Hours (except Asia). IC Markets is normally 2, but if you change it to 3 in Summer, you need to change the hours too, so it is easier not to change anything.
TradeParameters ="- - - - - - - - - - - - Trade Parameters - - - - - - - - - - - -";
NOTE: See what works for you, and check the chart before placing any trades. There are also more options than the basic 00-Level System, but have been added from suggestions made by other successful traders.
Trade Parameter Explanations
UseCurrentCandleForSignal:
If True, it will give a signal before the current bar closes.
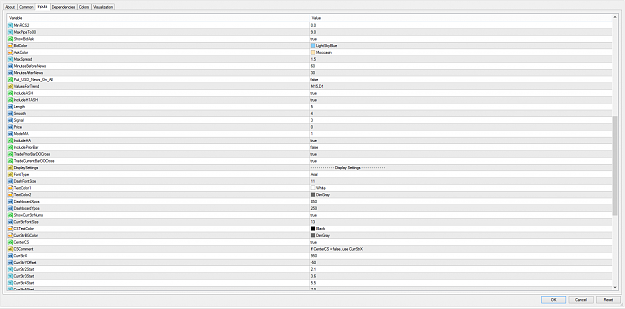
MinPipsFromDO:
How far price is away from the Daily Open. 7.0 means 7 full pips or 70 points.
Trade000Levels:
Set to True if you want to get alerts for the 000 levels. Sometimes price will bounce at these levels.
Trade100_900Levels:
Set to True if you want to override the restriction in the original rules.
Trade50Levels:
Set to True if you want to get alerts for the 50 levels. You will not get Sell signals at 100 or 050 and no Buy signals at 900 or 950.
TradeM15Method:
Set to True to automatically include ASH, H1ASH and HA as in Udine’s M15 method even if any of them are set to false.
Allow2nd00Level:
True or False. If you want alerts past the first 00 level. If True, you must set MaxPipsTo00 > 10. Note: if you set Trade50Levels = True, then this value is ignored.
IncludeMaxLevel:
True or False. If set to False, it will hide this column and give alerts at any level.
MaxLevel: “Level” (on Dashboard)
Max level to get alerts. Each 00 price point is another level (147.800, 147.900, etc.) Also, the Level column will display the next level value unless it is a non-trading level as determined by the rules or your choices, and will display 0 then.
LevelAboveBelowCandle:
Set to True if you only want to take the next level trade above the high or below the low of the previous candle. Otherwise leave it False.
ShowCSTrendArrows:
True if you want to see if the Currency Strength is going up or down.
CSHistory:
This is the number of ticks to calculate the average, in order to compare with recent values. This number starts after the CSRecentTicks.
CSRecentTicks:
The number of recent ticks to average, in order to compare with CSHistory. With the default settings, it will take the average of the last 5 ticks, and compare it to the average of the previous 30 ticks. This is to smooth out the change of direction arrows so they do not change on every single tick. You can try higher values if you think it is still too quick to change.
CSTrendRising:
Angled arrow if CSRecentTicks average is 0.1 (or whatever you choose) more than CSHistory average.
CSTrendRocket:
Vertical arrow if CSRecentTicks average is 0.2 (or whatever you choose) more than CSHistory average.
ShowCS2:
This is the CSM value calculated by adding up all the pips moved by each currency. The currencies highlighted are the 1/2/7/8.
IncludeMinRelStr:
True or False. If set to False, it will hide this column and ignore this value.
MinRelStr: “RelStr” (on Dashboard)
This is the difference between the Relative Strength of the 2 currency pairs. Some people will only trade a pair with a difference of 5 or greater. See what works for you.
IncludeRCSTrend:
If True, will include the trend arrows in the requirements for a valid signal.
ShowRCSTrendArrows:
True or False.
RequireRisingArrow:
If True, the arrow must be angled to get a valid signal. This value is based on 2 times the CSTrendRising since there are 2 currencies in a pair.
RequireRocketArrow:
If True, the arrow must be vertical to get a valid signal. This value is based on 2 times the CSTrendRocket since there are 2 currencies in a pair.
IncludeMinRCS2:
If set to False, it will hide this column and ignore this value.
MinRCS2: “RCS2” (on Dashboard)
This Weighted RCS gives higher values (up to 40) the closer either of the currencies is to 0 or 9. You can use both this and the previous RelStr or just one.
IncludeRCS2Trend:
If True, will include the trend arrows in the requirements for a valid signal.
ShowRCS2TrendArrows:
True or False.
RequireRisingArrow2:
(same as for RCS)
RequireRocketArrow2:
(same as for RCS)
IncludeMaxPipsTo00:
If set to False, it will hide this column and ignore this value.
MaxPipsTo00: “PipsTo00” (on Dashboard)
Set to 9.9 if you don’t care how far the open price is to the next 00 level. (Or 19.9 if using 2nd00Level.) Note: if you set Trade50Levels = True, then this value is ignored.
IncludeABR:
True or False. Calculates Average Bar Range on chart. If True, will include the ABR in the requirements for a signal.
AlwaysIncludePriorBar:
If True, and the previous bar is greater than the SignalBarMultiplier, the Dashboard will not give a signal. If set to False, the Dashboard will give a signal if UseCurrentCandleForSignal is set to True.
DisplayABR:
True or False.
ABRPeriods:
Number of bars to calculate ABR.
SignalBarMultiplier:
How much larger the SignalBar is than the calculated ABR. If UseCurrentCandleForSignal is True, the SignalBar is the current candle; if False, the previous candle.
ShowBidAsk: “Bid” “Ask” (on Dashboard)
True or False. False will hide the columns.
BidColor:
Your choice.
AskColor:
Your choice.
MaxSpread: “Spread” (on Dashboard)
The maximum spread you will accept for a setup. If set to 10 or more, it will hide this column and ignore this value.
MinutesBeforeNews: “News” (on Dashboard)
Red news. 60 recommended. If you do not want to exclude news-related trades, set this to 0, but we do not recommend trading during Important (Red) news releases.
MinutesAfterNews:
Red news. 30 recommended. If you do not want to exclude news-related trades, set this to 0, but we do not recommend trading during Important (Red) news releases. Also, if the 30 minutes expires in the middle of an hour, the Dashboard will wait until the beginning of the next hour for a signal as recommended by Udine.
Put_USD_News_On_All:
True will prevent any alerts during USD Red news. If you only want to filter certain USD events, just set it to False until within an hour or so of the event you want to avoid.
UseTrendArrowSignal:
A single arrow which shows Up if all Green and Down if all Red. If True, will be included in the signal criteria.
DisplayTrendArrow:
True or False.
ValuesForTrendArrow: “Trend” (on Dashboard)
This is the color of the candle for each time frame you choose. They all must be the same to get an Up or Down arrow. You can use up to 4, choosing from: "M15,H1,H4,D1". If you don’t care about the other TFs, just use H1 on the H1 chart, or M15 on the M15 chart.
UseTrendBoxesSignal:
Shows individual boxes for TFs. If True, will be included in the signal criteria.
DisplayTrendBoxes:
True or False.
ValuesForTrendBoxes:
You can use up to 4, choosing from: "M15,H1,H4,D1".
IncludePairSync:
If True, will set:
DefaultPairsToDisplay ="USDJPY,EURJPY,EURUSD,GBPJPY,GBPUSD,AUDJPY,AUDUSD,NZDJPY,NZDUSD";
and SortPairsAlphabetically = false;
This is using the idea that 2 pairs must give the same signal for a trade. The synced pairs are: AudJpy/AudUsd, EurJpy/EurUsd, GbpUsd/GbpJpy, NzdJpy/NzdUsd. Or EU/GU, AU/NU (if UJ>RelStrLimit).
UsdJpyRelStrLimit:
The limit of the RelStr between USD and JPY to determine whether to trade the /JPY and /USD pairs or only USD pairs.
IncludeASH: “ASH” (on Dashboard)
Absolute Strength value for the currency pair. True or False. False will hide the column and ignore this value. If True it will call the ASH.ex4 indicator so do not delete that one. Note: If you set TradeM15Method = True, then this will show Up or Down arrow only if either ASH or HA for the bar before the signal bar is opposite, that is green, then red.
RequireColorChange:
If set to True then either ASH, H1 or D1 has to be the opposite color the bar before they are all Red or Green.
ColorChangeASHonly:
If set to True, only ASH has to change color, not the Trend values.
IncludeH1ASH: “H1ASH” (on Dashboard)
Absolute Strength value for the currency pair on the H1 time frame. True or False. If True it will call the ASH.ex4 indicator so do not delete that one. This is for extra confirmation on the M15 method.
(ASH settings: RSI method)
Length = 5;
Smooth = 4;
Signal = 3;
Price = 0; // Price mode : 0-Close,1-Open,2-High,3-Low,4-Median,5-Typical,6-Weighted
ModeMA = 1;
IncludeHA: “HA” (on Dashboard)
Heiken Ashi candle color. True or False. False will hide the column and ignore this value. Note: This is the prior closed bar, not the current one. Note: If you set TradeM15Method = True, then this will show Up or Down arrow only if either ASH or HA for the bar before the prior bar is opposite, that is green, then red.
IncludePriorBar: “PriorBar” (on Dashboard)
Set to True if you want the bar before the signal bar to be the same as the current, both green or red. False will hide the column and ignore this value.
TradePriorBarDOCross:
Set to False if you do not want an alert where the bar before the signal bar opens on one side of DO and closes on the other. If IncludePriorBar = False, this value will be ignored.
TradeCurrentBarDOCross: (Optional)
Set to False if you do NOT want an alert where the signal bar opened on one side of the DO and closed on the other.
DisplaySettings = "- - - - - - - - - - - - Display Settings - - - - - - - - - - - -";
FontType:
Your choice.
DashFontSize:
Your choice.
TextColor1:
Color of column headings and pairs with potential setups.
TextColor2:
Color of pairs with no current potential setups. See Action column for reason.
DashboardXpos:
This is calculated from the Right side of the screen.
DashboardYpos:
From the top.
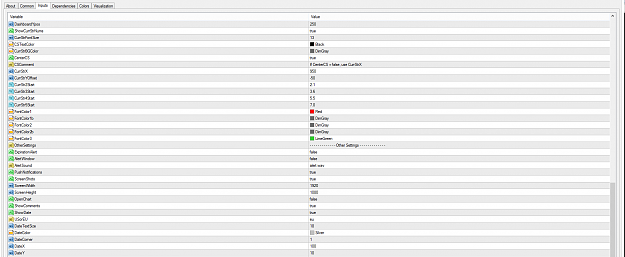
ShowCurrStrNums:
Set to True if you want to display the RCS numbers above the Dashboard.
ShowHighestLowest:
If true it will highlight only the 1/2/7/8 currencies like the CS2 does. Otherwise it will show the colors set by the 5 ranges.
CurrStrFontSize:
Will increase or decrease the entire size of the CSR.
CSTextColor:
Text Color.
CurrStrBGColor:
Background color for currencies.
CenterCS:
True will center the RCS over however many columns there are.
CurrStrX:
If CenterCS = false
CurrStrYOffset:
Positive numbers move it down, negative moves it up.
(CurrStr1Start = 0; cannot be changed. The rest can be changed if you want, but the default settings give ranges of 0-2 / 2.1-3.5 / 3.6-5.4 / 5.5-6.9 / 7-9)
FontColor1 thru FontColor3:
Suggested colors for the 5 ranges.
ArrowColor1 thru ArrowColor3:
Suggested colors for the 5 ranges.
PairSpace:
If your Symbol Pairs have letters after them, they can run into the next column, so add 5 or 10 or so until it looks right.
OtherSettings = "- - - - - - - - - - - - - Other Settings - - - - - - - - - - - - -";
Expiration Alert:
If you want to be notified when the current month is nearly over and the indicator needs to be updated.
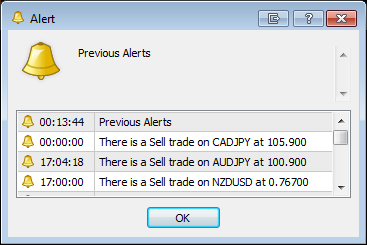
AlertWindow:
True if you want the normal popup alert window.
AlertSound:
You can specify an alert sound like "notify.wav" or leave it blank for personalized sounds, which will alert you to exactly which pair has the alert and the trade direction. These files will be in the Sounds folder. Note: There are only custom alerts for the standard 28 pairs.
PushNotifications:
Set to True to receive SMS alerts as configured in the Tools, Options.
ScreenShots:
True will automatically take a screen shot of the Dashboard at the moment of an alert, and put it in a Shots folder under the Files folder so you can confirm later what the setup was. The files will be named starting with the Julian date, from 1 to 365, the pair and the chart time in seconds to keep them organized.
ScreenWidth:
You can change these settings to change the width of the screenshot.
ScreenHeight:
You can change these settings to change the height of the screenshot.
OpenChart:
If True, MT4 will automatically open the chart for the alert pair IN THE SAME TF as the one with the Dashboard, so you don’t need to keep all the screens open if you don’t want to. Then you can quickly scan the chart to see if you want to take the trade. Note: Save your preferred chart template as “default” (without quotes) so it will open correctly.
ChartTF:
Set to preferred TF.
ShowComments:
True or False. This can help to make sure the Dashboard is operating correctly.
ShowDate:
True or False. Show date on screen.
USorEU:
March 30 or 30 March.
(Date settings)
DateTextSize:
DateColor:
DateCorner:
DateX:
DateY:
ShowBrokerTime:
ShowLocalTime:
Clock_Color:
Clock_FontSize:
Clock_Corner:
Clock_Ypos:
ShowVersionNumber:
ACTION Text Meanings
Buy:All chosen filters agree for a possible Long trade.
Sell:
All chosen filters agree for a possible Short trade.
RmLmt:
Price has reached RmUp or RmDn.
News:
News within MinutesBeforeNews and MinutesAfterNews time settings.
MinLvl:
If using MinAsiaLevel in Asia session, price is below the Minimum Level number.
MaxLvl:
If price has exceeded the MaxLevel desired.
ABR:
If signal bar is greater than SignalBarMultiplier.
Pips:
If not trading 50 levels, and the next entry level is farther than MaxPipsTo00.
Spread:
Spread is greater than MaxSpread.
DO Pips:
Price is too close to DO, as set in MinPipsFromDO.
PB DO X:
If TradePriorBarDOCross = false, and Open and Close of prior bar are on opposite sides of DO.
DO X:
If DoNotCrossDO = true, and Open and Close are on opposite sides of DO.
Wait:
If none of the other conditions exist and there is no setup.
Scripts and EAs
All of these will grab a screenshot too.
EAs:
All of these EAs have had the Commission fixed so it should be more accurate for non-USD pairs.
These first 2 just manage Pending orders after they have been filled, and if you place a Buy and a Sell it can cancel the other (OCO).
The only difference between the first and second is the second one uses Magic Number so your Pending (or Market) scripts need to add the Magic Number.
Attached File(s)
Attached File(s)
These next 2 do everything the previous ones do but can also place orders based on a Pending Line placed on the chart with the scripts below.
The first one will Buy when the Bid or Close crosses the Pending Line so the entry will be at the Ask price (spread difference).
The second one will buy when the Ask price crosses the Line just like a normal Pending order.
NOTE: The scripts will place the lines at the next level based on the Open price so if the Close price (or Ask) has already passed the line, you will get entered at Market price.
I also added an Expiration (DeletePendingAfterXBars) so they will delete the Pending line after X bars on the current TF.
Attached File(s)
Attached File(s)
Scripts:
Both of these scripts will place a Pending Line on the chart above or below the Open price. If you drag the script anywhere above ANY price bar, it will place the Line at the next Level above Open. Below does the opposite.
The first one is for H1 and only places Lines at 00 levels.
The second one is for M15 and places Lines at 00 and 50 levels.
Attached File(s)
Attached File(s)