These zones represent essential reversal areas grounded in Smart Money Concepts (SMC) and ICT methodologies, functioning as pivotal supply and demand regions for potential price reversals and continuations.
You can access the Indicator from this link:
https://tradingfinder.com/products/i...ignals-alerts/
You can access the Indicator on the TradingView website:
https://www.tradingview.com/script/2...ignals-Alerts/
Prop Firm DrawDown Protector : Prop Firm Capital Protection Expert MT5 |Forex Money Management: Forex Trade Management Expert MT5 | ICT Concepts Indicator MT5 |Smart Money Concepts Expert MT5 | Smart Money Trap Scanner | Get a free Expert Advisor license via Telegram and WhatsApp
OB & BB Signals + Alerts Indicator Specifications
The primary features and attributes of the Order Blocks and Breaker Blocks indicator are outlined as follows:
Indicator Categories
- ICT Tradingview Indicators
- Smart Money Tradingview Indicators
- Liquidity Tradingview Indicators
Platforms
- Trading View Indicators
Trading Skills
- Advanced
Indicator Types
- Reversal Tradingview Indicators
Timeframe
- Multi-Timeframe Tradingview Indicators
Trading Style
- Intraday Tradingview Indicators
Trading Instruments
- TradingView Indicators in the Forex Market
- Cryptocurrency Tradingview Indicators
- Stock Tradingview Indicators
- Commodity Tradingview Indicators
- Indices Tradingview Indicators
- Share Stocks Tradingview Indicators
Indicator at a Glance
Breaker Blocks emerge when Order Blocks are breached by price action, resulting in a reversal of their support or resistance functions. The OB & BB Signals + Alerts Indicator autonomously identifies and marks these zones with colored rectangles on the chart.
Furthermore, it delivers notifications upon the mitigation or equilibrium achievement of an Order Block or Breaker Block.
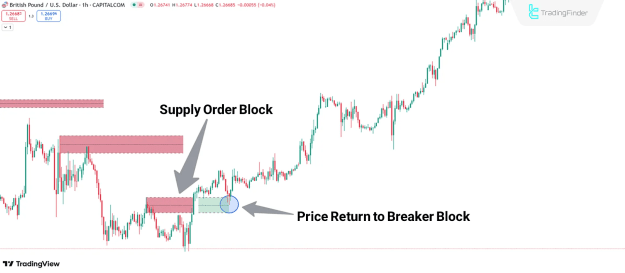
Bullish Trend Conditions
In the GBP/USD one-hour chart illustration, a supply Order Block (depicted as a red rectangle) is penetrated by price, converting it into a demand Breaker Block.
Price subsequently retraces to this zone during a corrective phase before resuming the bullish momentum.
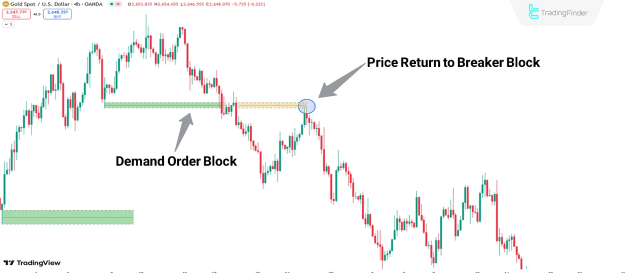
Bearish Trend Conditions
The accompanying diagram illustrates price surpassing a Demand Order Block (shown as a green rectangle) and transforming it into a Supply Breaker Block (indicated as a yellow rectangle).
The retest of the Supply Breaker Block by price presents a prime entry point for short positions, as price continues its bearish trajectory following the zone evaluation.
Analysis of Demand Order Block and Supply Breaker Block
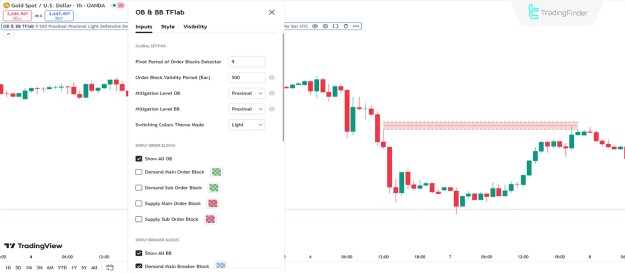
The configuration options for the OB & BB Signals + Alerts indicator are presented in the following overview:
Global Setting
- Pivot Period of Order Blocks Detector: Adjust the pivot timeframe for Order Block identification (Default: 9);
- Order Block Validity Period (Bar): Determine the Order Block lifespan in terms of candle count;
- Mitigation Level OB: Establish the foundational threshold for Order Block mitigation;
- Mitigation Level BB: Set the foundational threshold for Breaker Block mitigation;
- Switching Colors Theme Mode: Select the preferred color scheme;
Display Order Blocks
- Show All OB: Enable visibility of all Order Blocks on the chart;
- Demand Main Order Block: Activate display of the primary Demand Order Block and customize its color;
- Demand Sub Order Block: Enable display of secondary Demand Order Blocks;
- Supply Main Order Block: Activate display of the primary Supply Order Block and customize its color;
- Supply Sub Order Block: Enable display of secondary Supply Order Blocks;
Display Breaker Block
- Show All BB: Enable visibility of all Breaker Blocks on the chart;
- Demand Main Breaker Block: Activate display of the primary Demand Breaker Block and customize its color;
- Demand Sub Breaker Block: Enable display of secondary Demand Breaker Blocks;
- Supply Main Breaker Block: Activate display of the primary Supply Breaker Block and customize its color;
- Supply Sub Breaker Block: Enable display of secondary Supply Breaker Blocks;
Order Blocks Refinement
- Refine Demand Main: Configure Defensive mode for the primary Demand Order Block;
- Refine Demand Sub: Configure Defensive mode for secondary Demand Order Blocks;
- Refine Supply Main: Configure Defensive mode for the primary Supply Order Block;
- Refine Supply Sub: Configure Defensive mode for secondary Supply Order Blocks;
Alert
- Alerts Name: Assign a personalized label for notifications;
- Alert Demand OB Mitigation: Toggle alerts for Demand Order Block mitigation;
- Alert Demand BB Mitigation: Toggle alerts for Demand Breaker Block mitigation;
- Alert Supply OB Mitigation: Toggle alerts for Supply Order Block mitigation;
- Alert Supply BB Mitigation: Toggle alerts for Supply Breaker Block mitigation;
- Message Frequency: Specify the notification cadence (e.g., Once per bar);
- Show Alert Time by Time Zone: Present alert timestamps according to a designated time zone (Default: UTC).
Conclusion
The OB & BB Signals + Alerts Indicator integrates into a collection of instruments centered on Smart Money Concepts (SMC) and ICT trading approaches.
This tool pinpoints and illustrates vital reversal zones, termed Order Blocks and Breaker Blocks, while issuing notifications for mitigation events and price balance.
These designated areas operate as key supply and demand territories, where substantial price shifts are anticipated.