You can download it from this link:
https://cdn.tradingfinder.com/file/2...4-by-tflab.zip
You can also access the MetaTrader 5 version of this indicator through this page:
https://www.metalsmine.com/thread/13...ndicator-sm-lq
For instructions on how to install:
https://www.forexfactory.com/thread/...-in-metatrader
- CategoryICT - Smart Money - Liquidity
- PlatformMetaTrader 4
- Skill LevelAdvanced (ICT Knowledge Required)
- Signal TypeReversal & Breakout
- TimeframeM15 - H4 (Multi-Timeframe)
- Best ForForex, Gold (XAU/USD), Commodities
- Trading StyleDay Trading, Swing Trading
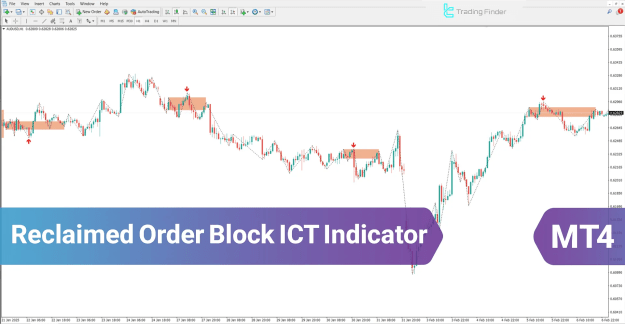
![]() Trading Signals Explained
Trading Signals Explained
![]() Bullish Reclaimed Order Block (Buy Signal)
Bullish Reclaimed Order Block (Buy Signal)
- Setup:
- Price breaks bearish structure, then retests the order block
- Forms 2 or 5 consecutive bullish pivots (confirmed demand zone)
- Confirmation:
- Red arrow appears at the pivot low
- Often coincides with liquidity grab below the zone
- Example:
- XAU/USD (1H Chart) – Price reclaims order block after initial break, signaling long entry.
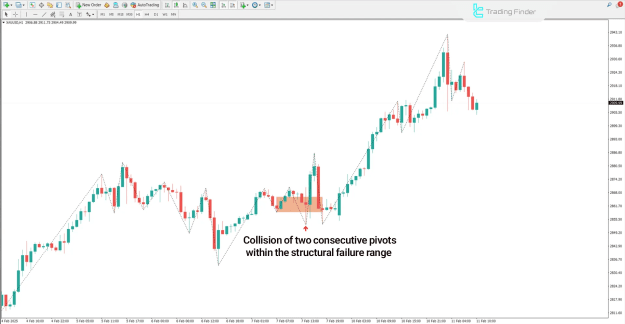
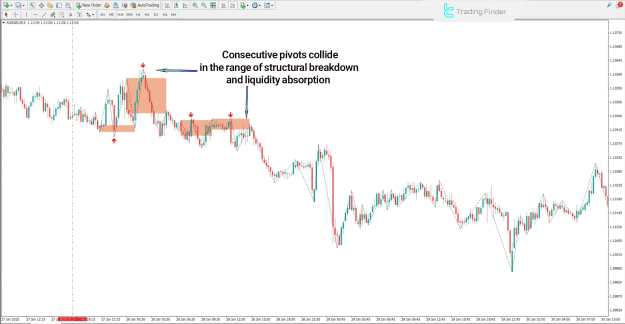
![]() Bearish Reclaimed Order Block (Sell Signal)
Bearish Reclaimed Order Block (Sell Signal)
- Setup:
- Price breaks bullish structure, then retests the order block
- Forms 2 or 5 consecutive bearish pivots (confirmed supply zone)
- Confirmation:
- Red arrow marks the rejection
- Often aligns with liquidity sweep above the zone
- Example:
- AUD/NZD (15M Chart) – Price returns to a reclaimed order block, signaling short entry.
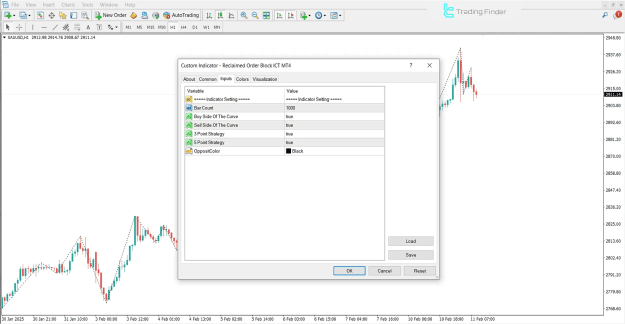
![]() Optimal Settings
Optimal Settings
1. Strategy Selection
- 3-Point Strategy (Conservative):
- Requires 3 consecutive pivots for confirmation (fewer false signals).
- 5-Point Strategy (Aggressive):
- Faster signals but higher risk (best for trending markets).
2. Visual Customization
- Buy Side Curve: Highlights bullish order blocks (demand zones).
- Sell Side Curve: Marks bearish order blocks (supply zones).
- Opposite Color: Enhances visibility of rejection candles.
3. Sensitivity Adjustment
- Bar Count: Set to 5-20 candles for optimal block detection.
![]() Pro Trading Strategies
Pro Trading Strategies
1. London/NY Session Liquidity Plays
- Trade order blocks formed during session opens (08:00 GMT / 13:00 GMT).
- Confirm with volume spikes or FVG (Fair Value Gap).
2. Multi-Timeframe Confluence
- H1 Order Block + M15 Retest = High-probability entry.
- Works exceptionally well in Gold (XAU/USD) & Major Forex Pairs.
3. Liquidity Sweep Confirmation
- Wait for stop hunts (liquidity grabs) before entering.
![]() Critical Notes
Critical Notes
- Avoid Choppy Markets: Works best in trending conditions.
- Use Stop-Losses: False breaks can occur.
- Combine with ICT Concepts: FVG, Market Structure Shifts, Kill Zones.
![]() Why Traders Use This Indicator
Why Traders Use This Indicator
![]() Identifies Institutional Liquidity Zones
Identifies Institutional Liquidity Zones
![]() Clear Visual Arrows for Entries
Clear Visual Arrows for Entries
![]() Works on All Markets (Forex, Gold, Indices, Crypto)
Works on All Markets (Forex, Gold, Indices, Crypto)
![]() Perfect for ICT-Based Trading Strategies
Perfect for ICT-Based Trading Strategies
This indicator transforms complex order flow analysis into simple, actionable zones, giving retail traders institutional-level insights. For best results, backtest on M15-H1 timeframes before live trading.